Introduction
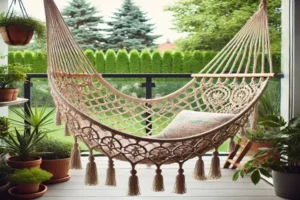
Macramé hammocks are a beautiful and functional addition to any outdoor space, offering a perfect blend of comfort and style. Whether you have a cozy balcony or a sprawling garden, a macramé hammock provides a unique spot to relax and enjoy the outdoors. The intricate patterns and natural materials used in macramé create an aesthetic appeal that enhances the ambiance of any space.
The versatility of DIY macramé projects allows you to craft a hammock that fits your exact needs and personal style. From choosing the right type of rope to incorporating your favorite colors and decorative elements, the possibilities are endless. Creating your own macramé hammock not only allows for complete customization but also offers the satisfaction of handcrafting something that is both beautiful and useful.
In this guide, we will explore how to create a custom macramé hammock that adds a personal touch to your balcony or garden. Whether you’re new to macramé or a seasoned crafter, this project will provide a rewarding experience and a stunning result.
Choosing the Right Materials for Your DIY Macramé Hammock
Creating a durable and aesthetically pleasing macramé hammock begins with selecting the right materials. The quality and type of materials you choose will directly impact the comfort, longevity, and overall look of your hammock.
Selecting the Rope
The rope you choose for your macramé hammock is crucial, as it needs to be strong, durable, and suitable for outdoor conditions. Here are some common types of rope used in macramé hammocks:
- Cotton Rope: Soft and flexible, cotton rope is a popular choice for macramé projects. It’s easy to work with and provides a comfortable feel, making it ideal for hammocks. However, cotton can absorb moisture, so it may not be the best option for areas with high humidity or frequent rain.
- Nylon Rope: Known for its strength and resistance to weather, nylon rope is an excellent option for outdoor hammocks. It resists mildew and dries quickly, making it suitable for various climates. The slight elasticity of nylon also adds comfort, as it gently conforms to your body.
- Jute Rope: Jute offers a natural, rustic look that complements outdoor settings beautifully. It’s environmentally friendly and adds a unique texture to your hammock. However, jute is less durable than cotton or nylon, so it may require more frequent maintenance and care.
When choosing your rope, consider the weight capacity, comfort, and how it will withstand outdoor elements. Durability and weather resistance are key factors in ensuring your hammock remains in good condition over time.
Additional Tools and Materials
In addition to the rope, several other tools and materials are essential for your DIY macramé hammock project:
- Scissors: A sharp pair of scissors is necessary for cutting the rope cleanly and efficiently. Ensure your scissors are sturdy enough to handle thick ropes.
- Measuring Tape: Accurate measurements are crucial to ensure your hammock is the right size. A measuring tape will help you cut the rope to the correct lengths and maintain consistency throughout the project.
- Wooden Dowels or Metal Rings: These are used to anchor the ends of your hammock and provide support. Wooden dowels are often used in more traditional designs, while metal rings offer a sleek, modern look.
- Optional Decorative Elements: If you want to add a personal touch to your hammock, consider incorporating decorative elements like beads, tassels, or fringes. These additions can enhance the visual appeal and make your hammock truly one-of-a-kind.
By carefully selecting the right materials and tools, you’ll set a strong foundation for your DIY macramé hammock, ensuring it is both functional and stylish for your balcony or garden.
Step-by-Step Guide to Making Your DIY Macramé Hammock
Now that you’ve gathered your materials, it’s time to dive into the creation of your macramé hammock. This section provides a detailed, step-by-step guide to help you craft a beautiful and functional hammock for your balcony or garden. By following these instructions, even beginners can create a professional-looking hammock.
Preparing the Rope
The first step in making your macramé hammock is preparing the rope. Proper preparation ensures that the process goes smoothly and that your hammock turns out just as you envisioned.
- Measuring and Cutting the Rope: Begin by measuring and cutting the rope to the required lengths. The exact measurements will depend on the size of the hammock you want to create, but a general guideline is to cut each strand at least twice the length of the finished hammock. This allows for the length lost in knotting and ensures you have enough rope to complete the project. It’s better to have excess rope that can be trimmed later than to run out mid-project.
- Organizing and Preparing the Strands: After cutting the rope, organize the strands by laying them out in parallel. This will help you avoid tangles and make the knotting process more manageable. If you’re using multiple colors, arrange them in the desired pattern before starting. Consider using a clipboard, hooks, or a secure surface to keep the ropes steady as you work.
Basic Macramé Knots for Hammocks
Understanding and mastering basic macramé knots is essential for creating a strong and aesthetically pleasing hammock. Here are three essential knots you’ll need:
- Square Knot: The square knot is one of the most fundamental knots in macramé. It consists of two half knots tied in opposite directions, creating a symmetrical design. To tie a square knot, divide your strands into four groups. Cross the left strand over the middle two strands and under the right strand, then bring the right strand under the middle strands and over the left strand. Repeat this process in the opposite direction to complete the knot.
- Lark’s Head Knot: This knot is commonly used to attach the rope to a dowel or ring. Fold a rope strand in half, then loop the folded end around the dowel or ring, pulling the two loose ends through the loop. Tighten to secure the knot.
- Double Half Hitch: The double half hitch is a versatile knot used for adding stability to your hammock. To create this knot, bring one strand over another to form a loop, then pull the end through the loop. Repeat to create a second loop, then tighten.
These knots form the basis of your macramé hammock, providing both structure and decorative elements. Practice these knots until you’re comfortable, as they will be used repeatedly throughout the project.
Weaving the Hammock Body
With your ropes prepared and knots mastered, it’s time to start weaving the hammock body. This is the most labor-intensive part of the project, but also the most rewarding.
- Step-by-Step Guidance: Begin by attaching your ropes to a dowel or ring using the lark’s head knot. Once all the ropes are secured, start weaving by tying square knots in alternating rows. This creates the characteristic diamond pattern of a macramé hammock. Ensure each knot is tight and even, maintaining consistent tension to avoid gaps or uneven sections.
- Tips for Even Tension and Consistency: As you work, regularly check that the knots are evenly spaced and that the tension is consistent across all strands. It’s helpful to step back periodically to view your progress from a distance, ensuring the hammock body is symmetrical.
Adding Finishing Touches
Once the body of the hammock is complete, you can add finishing touches that enhance both its function and aesthetic appeal.
- Decorative Elements: Adding fringes, tassels, or beads can elevate the look of your hammock. To create fringes, simply leave extra length at the ends of the ropes and trim them to the desired length once all knots are tied. Tassels can be added by tying small bunches of rope together and securing them to the hammock’s edges.
- Securing and Reinforcing the Ends: To ensure your hammock is sturdy and safe, reinforce the ends where the hammock will be hung. Double or triple the knots at these points and consider wrapping the ends with additional rope for extra durability. This not only secures the hammock but also adds a neat finishing touch.
By following these steps, you’ll create a beautiful macramé hammock that’s both functional and stylish, perfect for relaxing on your balcony or in your garden.
Installing Your Macramé Hammock on Balconies and Gardens
Once your macramé hammock is complete, the next step is to install it in the perfect spot on your balcony or garden. Proper installation ensures that your hammock is not only a comfortable place to relax but also a safe and aesthetically pleasing addition to your outdoor space.
Choosing the Perfect Spot
Selecting the ideal location for your hammock is crucial to maximizing comfort and enjoyment. Here are some tips to help you find the perfect spot:
- Tips on Selecting the Best Location: Look for a location that offers both shade and sunlight, depending on your preferences. A shaded spot will keep you cool on hot days, while a sunny area is ideal for basking in the warmth. If you’re installing the hammock on a balcony, ensure there’s enough space to accommodate the full length and width of the hammock without it being cramped.
- Considerations for Safety, Comfort, and Aesthetics: Safety is paramount, so choose a location where the hammock can be securely anchored to strong supports, such as sturdy beams, walls, or trees. The height at which you hang the hammock should be comfortable enough for you to get in and out easily, typically around 4 to 5 feet off the ground. Aesthetically, consider how the hammock will fit into the overall design of your outdoor space, complementing existing furniture and plants.
Hanging Your Hammock Securely
Hanging your macramé hammock correctly is essential to ensure it is safe and secure. Follow these steps for a successful installation:
- Instructions on How to Properly Hang the Hammock: Begin by measuring the distance between the two anchor points. The distance should be slightly less than the length of your hammock, allowing for some sag in the middle. Attach strong hooks or eye bolts to the anchor points, ensuring they are installed in solid wood or masonry. Use sturdy ropes or chains to hang the hammock from the hooks, adjusting the length as needed to achieve the desired height and tension.
- Discuss Weight Distribution and Safety Tips: Proper weight distribution is critical to prevent the hammock from tipping or putting excessive strain on the anchor points. Make sure the hammock is level and that the weight is evenly distributed across the entire length of the hammock. Periodically check the knots and anchor points to ensure they remain secure over time. For added safety, consider using carabiners or quick links to attach the hammock to the hanging ropes or chains, allowing for easy adjustments and extra security.
By carefully selecting the location and securely hanging your macramé hammock, you’ll create a comfortable and stylish outdoor retreat where you can unwind and enjoy the beauty of your balcony or garden.
Maintaining and Caring for Your Macramé Hammock
To ensure your macramé hammock remains in excellent condition and provides long-lasting comfort, it’s important to take proper care of it. Regular maintenance will keep your hammock looking beautiful and functioning well, even with frequent use.
Cleaning and Storing the Hammock
Proper cleaning and storage are key to preserving the quality and appearance of your macramé hammock. Here’s how to do it:
- Best Practices for Cleaning the Hammock: To clean your hammock, start by gently shaking off any loose dirt or debris. If the hammock is particularly dirty, you can hand wash it using mild soap and lukewarm water. Avoid using harsh chemicals or bleach, as these can damage the fibers. After washing, rinse thoroughly to remove all soap residue. To dry, lay the hammock flat in a shaded area to prevent fading from direct sunlight. Make sure the hammock is completely dry before storing it to avoid mildew.
- Tips on Storing the Hammock When Not in Use: When not in use, store your hammock in a cool, dry place to prevent wear and tear. Avoid leaving it outdoors for extended periods, as prolonged exposure to the elements can weaken the fibers. If possible, store the hammock in a breathable storage bag or container to protect it from dust and moisture. When storing, ensure that the hammock is loosely folded to prevent creasing and tangling of the ropes.
Repairing Common Issues
Over time, your macramé hammock may develop some common issues, such as fraying or loose knots. Knowing how to repair these problems will help extend the life of your hammock.
- How to Fix Common Problems Like Fraying or Loose Knots: If you notice any fraying, trim the affected areas with sharp scissors to prevent further unraveling. For loose knots, simply retie them, making sure they are secure and tight. If a knot becomes difficult to undo, you can use a small crochet hook or needle to help loosen it without damaging the rope.
- Advice on Reinforcing the Hammock If It Shows Signs of Wear: If your hammock shows signs of wear, such as thinning or weakened areas, consider reinforcing these sections with additional rope. You can do this by weaving new strands into the existing pattern or by adding extra knots to strengthen the structure. Regularly check the anchor points and hanging hardware to ensure they remain in good condition, replacing them as needed to maintain safety.
By following these maintenance and repair tips, you can keep your macramé hammock in great shape, allowing you to enjoy it for years to come.
Conclusion
Creating a personalized macramé hammock for your outdoor space is not only a rewarding project but also a way to add a unique and cozy touch to your balcony or garden. The satisfaction of crafting something with your own hands, tailored to your style and preferences, is unparalleled. As you relax in your handmade hammock, you’ll appreciate the time and effort you invested in bringing this beautiful piece to life.
Don’t be afraid to experiment with different designs, knots, and decorative elements. Macramé offers endless possibilities, allowing you to truly make the project your own. Whether you choose a simple, minimalist design or something more intricate and detailed, the final product will be a reflection of your creativity and skill.
Finally, remember that your hammock is not just a decorative item but a functional one as well. Take the time to enjoy it—whether you’re reading a book, taking a nap, or simply soaking up the beauty of your outdoor space. With the proper care and maintenance, your macramé hammock will be a stylish and comfortable addition to your balcony or garden for years to come.


